Key Capabilities
For Account Executives and CSMs:- View community engagement for any Contact or Lead
- See which communities they’ve joined
- Track their activity levels
- Analyze Account-level community engagement
- View aggregate activity across all associated Contacts
- Generate reports on community engagement by deal value
- Compare deal performance based on community engagement levels
How It Works
The integration consists of two parts: a Salesforce Managed Package installed in your Salesforce org, and a connection configured in the Tightknit Admin Studio. Once the integration is enabled, Tightknit pushes community and member profile data to Salesforce, populating custom Tightknit Community and Community Member records. It also begins a periodic sync of all new community activity, creating Community Activity records in Salesforce.- Records are pushed using the Bulk API 2.0.
- Activity syncs run every 5 minutes, batching all new activity within that interval.
- Members are linked to Contacts by email matching. You can manually override any incorrect links.
- An initial backfill sync imports your existing historical data when you first enable the integration.
Data Model
The managed package includes three custom objects organized in a simple hierarchy: Tightknit Community (Community__c) ← Community Member (Member__c) ← Community Activity (Activity__c). Each Community Member also has a configurable lookup to a standard Contact record.
| Object | API name | Description |
|---|---|---|
| Tightknit Community | Community__c | Represents a Tightknit community (e.g., a Slack workspace). Stores the community name, Slack workspace info, and logo. |
| Community Member | Member__c | A member of a community. Includes profile details like name, email, and Slack user ID. Each member belongs to a Tightknit Community and can optionally be linked to a Salesforce Contact. |
| Community Activity | Activity__c | An activity event performed by a member, such as sending a message or adding a reaction. Includes the activity type, timestamp, and related members. |
Community__c appears as tightknit__Community__c in reports, list views, and SOQL.Install the Managed Package
| Property | Value |
|---|---|
| Package | Tightknit Analytics |
| Namespace | tightknit |
| Subscriber Package Version Id | 04tdM000000UN2PQAW |
| Version | 1.7.0.1 |
| API Version | 65.0 |
| Installation Password | None (no installation key required) |
| Installation URL | Install Link |
- Installation Link
- Salesforce CLI
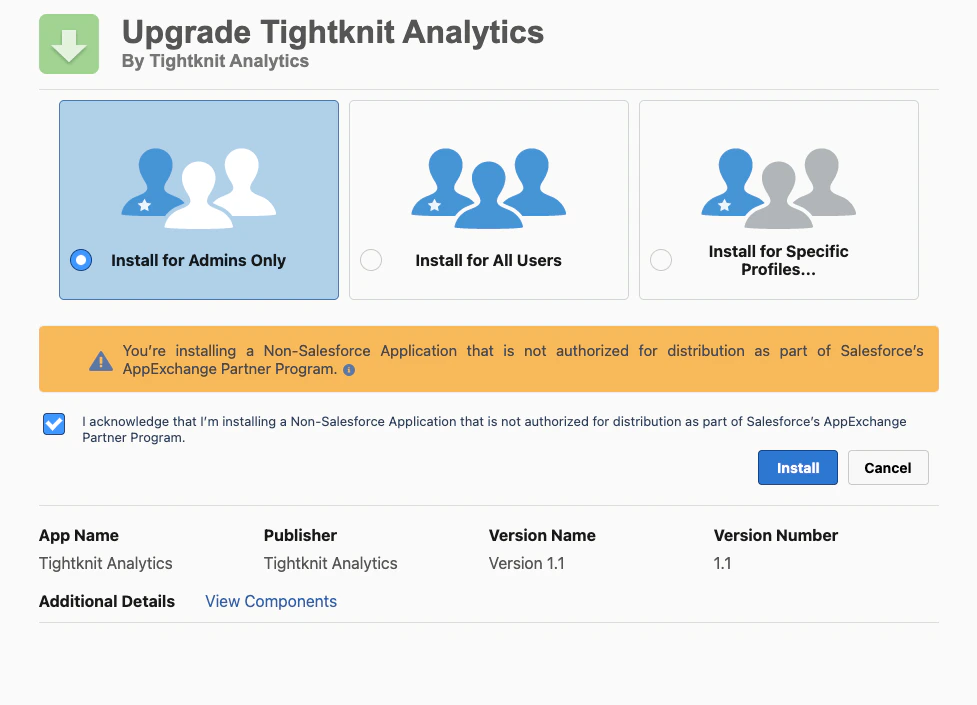
https://<domain>.my.salesforce.com/packaging/installPackage.apexp?p0=04tdM000000UN2PQAWBefore You Begin
Configure the Connection in Salesforce
- Integration user — a dedicated Salesforce user account that Tightknit signs in with to sync data, instead of using a real person’s account. Think of it as a robot account.
- Permission set — a switchable bundle of permissions you assign to a user. Salesforce starts locked down, and permission sets are how you hand out exactly the access something needs. Tightknit ships ready-made ones, so you assign rather than build them.
- License — the type of seat a user occupies. It caps what that user can do, and a permission set can only switch on access the license already allows.
- External Client App — the pre-built component that lets Tightknit sign in to your org securely (the OAuth handshake).
Assign yourself the Tightknit Admin permission set
- In Salesforce, go to Setup. In the Quick Find search box, type
Permission Setsand click it. - Click Tightknit Admin in the list.
- Click Manage Assignments, then Add Assignment.
- Check the box next to your own user, click Next, then click Assign.
Run the setup wizard to create your integration user
Grant the integration user Read access to Contacts
- Add a minimal extra permission set (recommended). Create a new permission set, give it Read on Contact, and assign it to the integration user alongside the Tightknit one. This is the cleanest option because it adds access without touching anything else, and survives package upgrades.
- Edit the integration user’s profile. Open the profile the integration user is on and turn on Read for the Contact object there.
Configure the External Client App OAuth policies
- Go to Setup, and in Quick Find open External Client App Manager.
- Click Tightknit Salesforce, open the Policies tab, and click Edit.
- Under OAuth Policies:
- Permitted Users: “Admin approved users are pre-authorized” (recommended), so only users you authorize can connect. You can choose “All users may self-authorize” instead, but it is less restrictive.
- Refresh Token Policy: “Refresh token is valid until revoked”, so the connection doesn’t expire on its own.
- IP Relaxation: “Relax IP restrictions” unless your security team requires otherwise.
- Click Manage Permission Sets and add Tightknit Integration User (plus Tightknit Admin if the integration user is also an admin). This authorizes the integration user under the “Admin approved” policy. Skipping it is the most common setup mistake and causes the connection to fail (
OAUTH_APP_ACCESS_DENIED, “user is not admin approved to access this app”, orOAUTH_APPROVAL_ERROR_GENERIC). - Save.
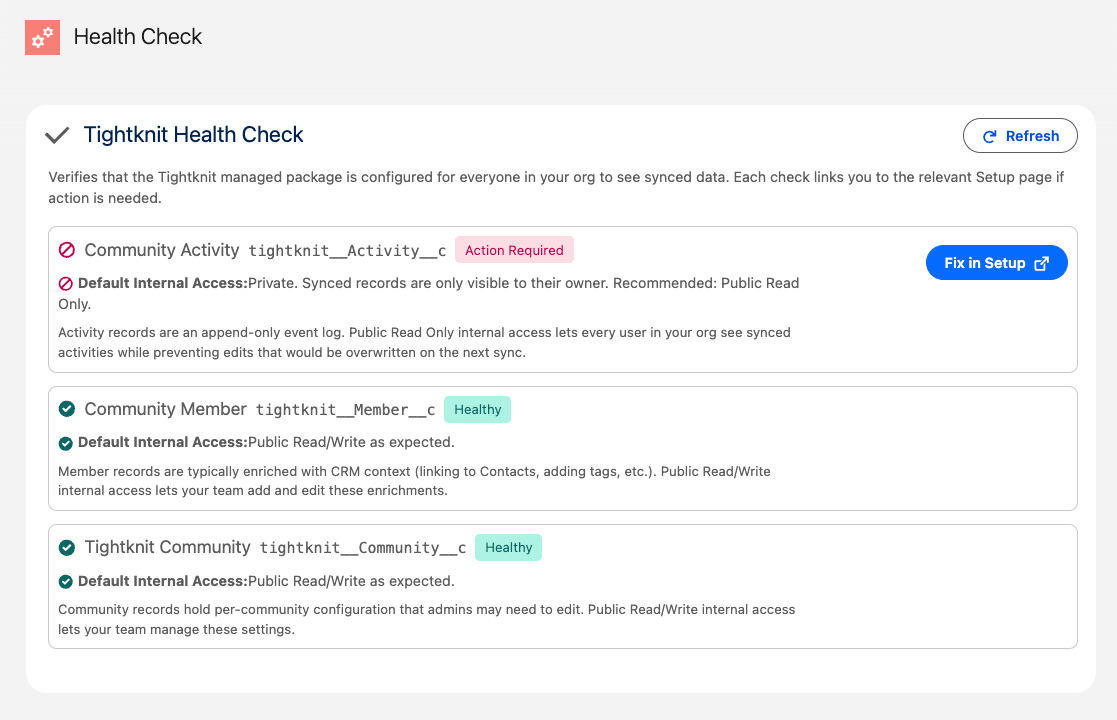
Run the Health Check (optional but recommended)
Grant Your IT Admin Access to the Studio
If your Salesforce administrator is not already a Studio user, you need to invite them and assign the Integrations Manager role so they can manage the Salesforce connection.Invite the user
Configure the Connection in Tightknit
Open the Salesforce integration settings
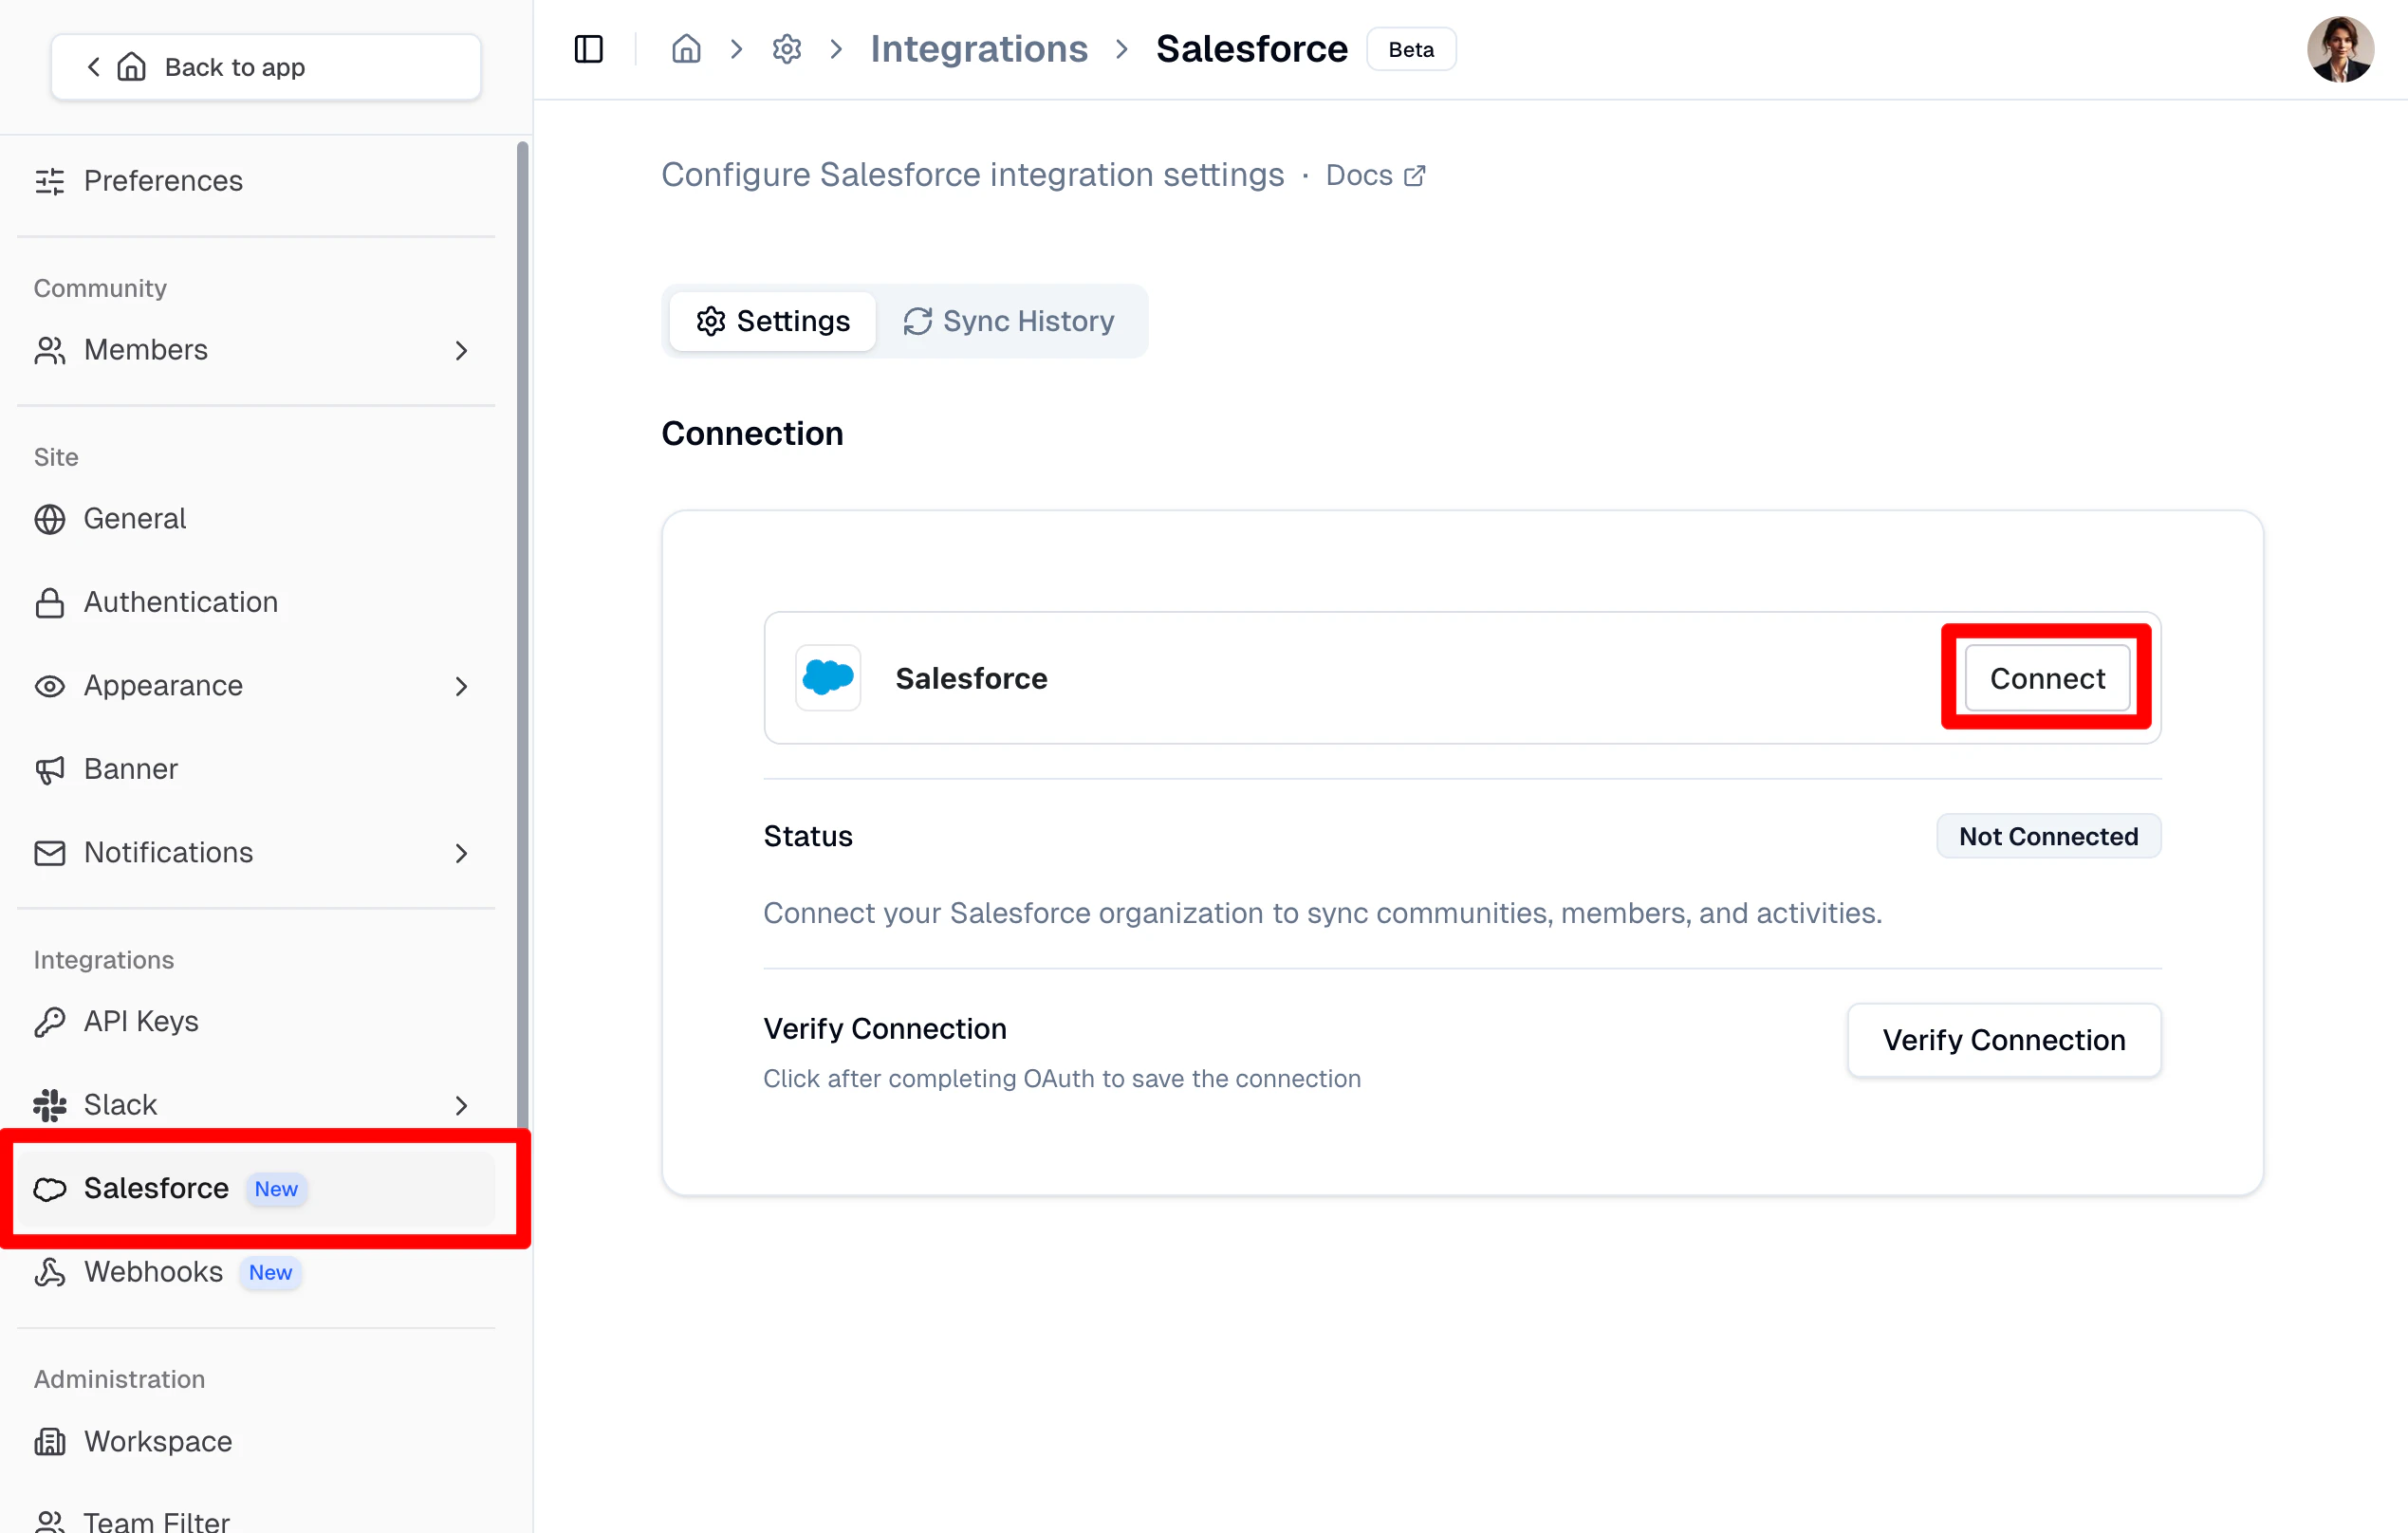
Connect to Salesforce from the Tightknit App
Connect to your Salesforce org
In a separate browser tab, log in to Salesforce with the integration user’s own credentials (a real login, not “Login As”; see Before You Begin). Then return here and click Connect to authorize. The Salesforce user that is logged in when the connection is authorized will be treated as the integration user for the Tightknit sync going forward.Verify the managed package
Click the Verify Managed Package button to confirm the package is correctly installed in Salesforce.Configure and Start the Sync
After connecting your Salesforce org, the settings page presents a three-step timeline wizard: Connect, Configure, and Backfill. You can adjust every sync option before starting the sync for the first time.Connect
Configure sync settings
- Create Contacts — create a new Salesforce Contact for any community member that cannot be matched by email.
- Activity Metadata — include additional metadata fields on synced Activity records.
- Matching field — the Contact field used to match community members (default: email).
- Sync interval — how frequently incremental syncs run (for example, every 5 minutes).
Review and start the sync
Monitoring Sync History
The Sync History tab shows a log of every sync job (backfill and incremental) with explicit counts of succeeded and failed records. Expand any row to see a summary of that sync run.Investigating failed sync jobs
When a sync job has failures, the expanded row shows an Investigate button. Clicking it opens a detail page with:- A summary of the sync job (status, timing, record counts).
- A breakdown of the underlying Salesforce Bulk API jobs, showing per-object totals for processed, succeeded, and failed records.
Disconnect the Salesforce Integration
Disconnecting requires two separate actions in the Studio: one to tear down the integration connection, and one to revoke the underlying Salesforce OAuth account.Disconnect the integration connection
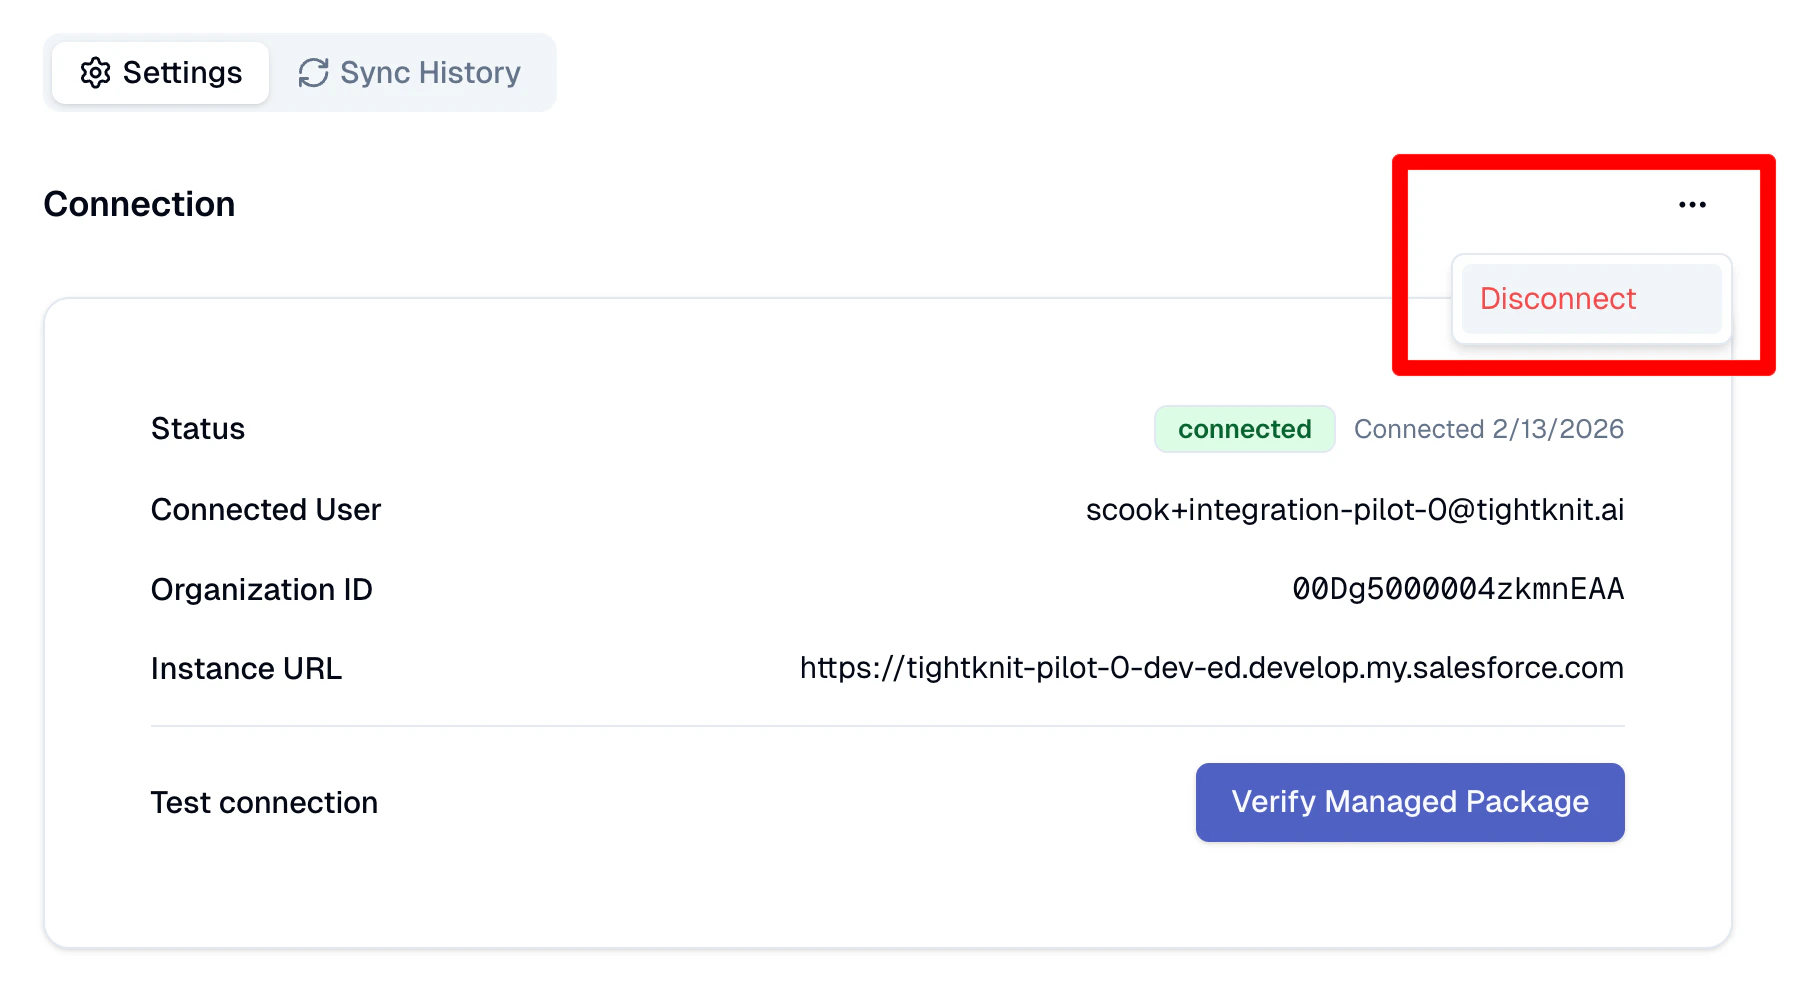
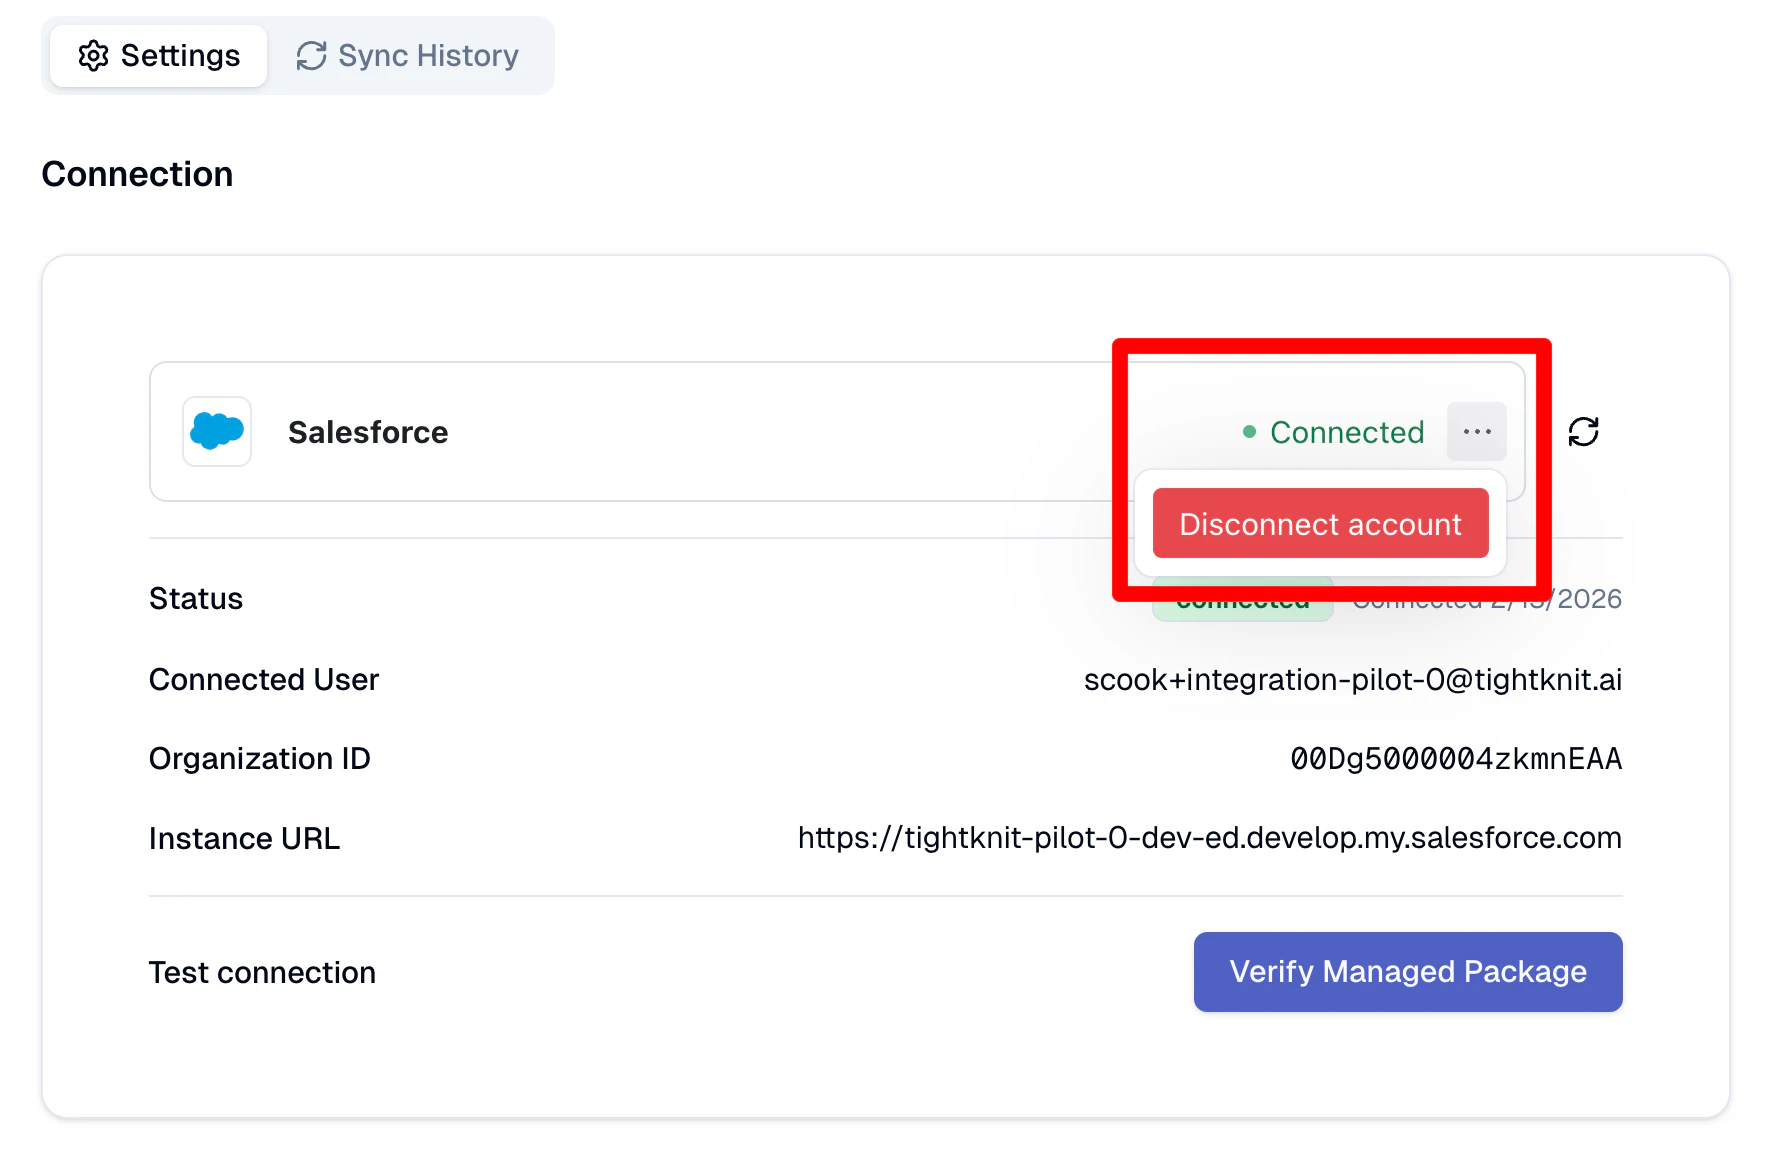
Disconnect the Salesforce account
Additional Salesforce Customization
LWC Components
The managed package includes sample page layouts and custom Lightning Web Components that you can add to your Salesforce pages using Lightning App Builder. We recommend exploring the following components:| Component | LWC Name | Target Page | Description | Preview |
|---|---|---|---|---|
| Account Community Activity Summary | tightknitAccountCommunityActivitySummary | Account Record Detail Page | Displays a summary of community activity for contacts associated with an Account. | 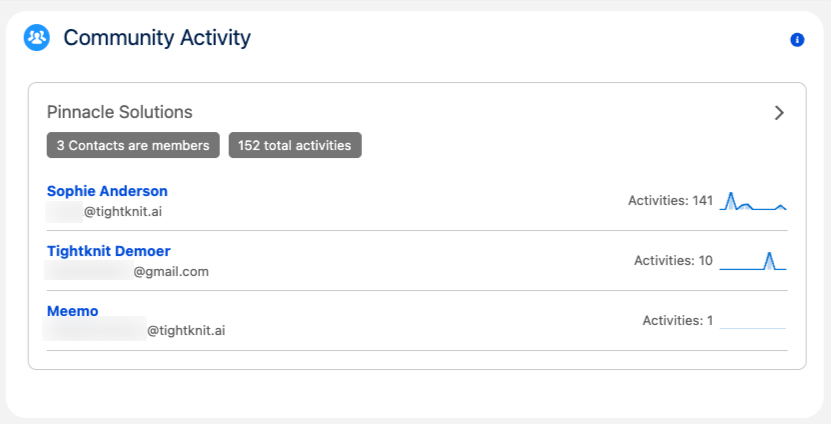 |
| Activity Info | tightknitCommunityActivityInfo | Activity Record Detail Page | Displays detailed information about a single Activity record including related members and community. |  |
| Community Activity Summary | tightknitCommunityActivitySummary | Community Record Detail Page | Displays a summary of member activity for a single Community. | 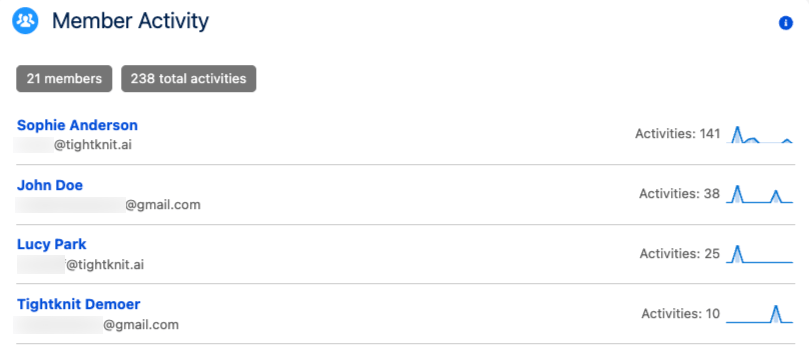 |
| Community Profile | tightknitCommunityProfile | Contact Record Detail Page | Displays Tightknit community profile information based on the contact’s email. |  |
| Contact Member Activity Log | tightknitContactMemberActivityLog | Contact Record Detail Page | Displays a list of recent Tightknit activities for a Contact or Lead by matching their email to Member records. | 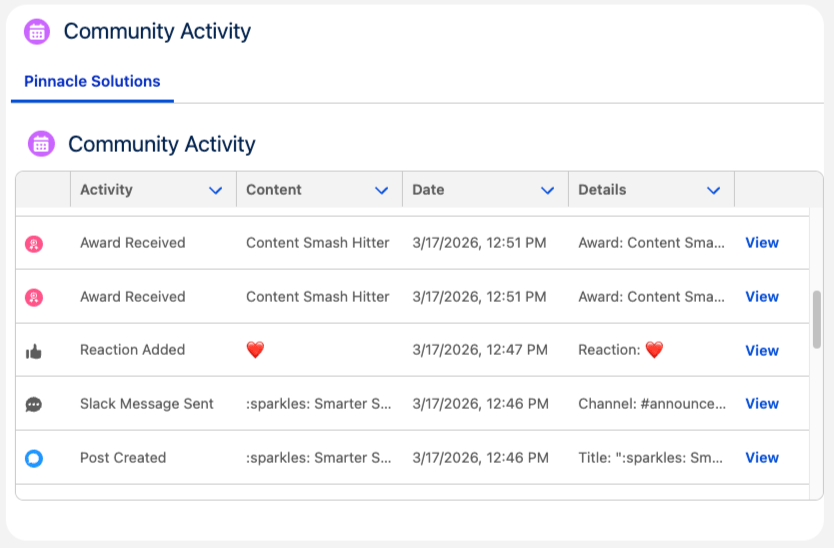 |
| Member Activity Log | tightknitMemberActivityLog | Member Record Detail Page | Displays a list of recent Tightknit activities for a Member record. | 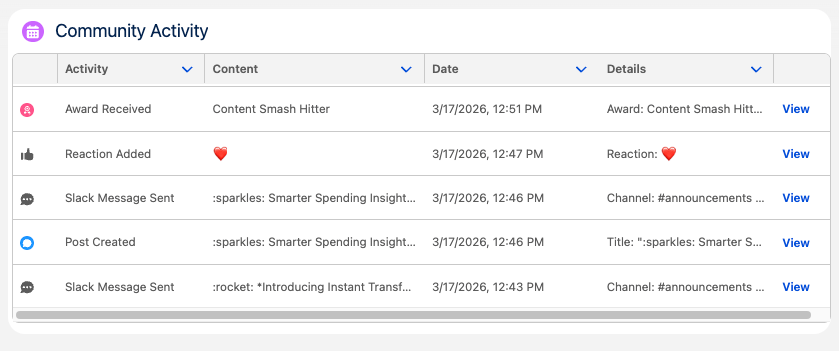 |
| View in Tightknit | tightknitViewInStudioButton | Member Record Detail Page, Contact Record Detail Page | Button to open the member’s profile page in the Tightknit Admin Studio. | — |
Permission sets
The Tightknit package ships three permission sets, each aimed at a different kind of user. Each bundles the full access that user needs, so you don’t have to assign individual permissions. To assign any of them: go to Setup → Permission Sets, click the set, click Manage Assignments → Add Assignment, pick the users, and click Assign. Here’s who gets which one:| Permission set | Grants | Assign to |
|---|---|---|
| Tightknit Read Only | Read-only access to Tightknit data and the LWC controllers. No create/edit/delete, no Setup app, no admin permissions. | Any user who should view the Tightknit components on Contact, Lead, Account, Community, Member, and Activity pages. Safe to assign broadly. |
| Tightknit Admin | Full access to the Tightknit objects plus the Tightknit Setup and Tightknit apps, Health Check, and admin-only features. | Admins who configure or manage the integration. |
| Tightknit Integration User | API-only access (full CRUD on Tightknit objects, ApiEnabled) for the sync. No Setup app. | The dedicated integration user that runs the sync. |
Permission set group
The package also ships a Tightknit Users permission set group. A permission set group bundles permission sets into a single assignable unit — you assign the group to a user and they receive the combined access of every set inside it. Tightknit Users currently contains Tightknit Read Only, and it is the recommended way to grant end-user access. Assign the group instead of the underlying permission set: when future versions add new end-user capabilities to the group, everyone already assigned picks them up automatically — no re-assignment needed.Building your own integration user permission set (advanced)
ApiEnabled— the OAuth token can’t make API calls without it. Required even on profiles that already have API access, so the integration user works on restricted profiles like Minimum Access - Salesforce or the Salesforce Integration license.
Contact: Read — the sync queries Contacts by email to link Tightknit members to existing CRM Contacts, and theMember__c.Contact__clookup field needs the target object to be readable in the user’s schema.Contact: Create — also required if you enable the Create Contacts option in Configure and Start the Sync. Without that setting on, Read alone is sufficient.
Community__c, Member__c, and Activity__c, grant: Create, Read, Edit, Delete, View All Records, and Modify All Records.
Standard CRUD lets the sync upsert records. Modify All Records is required because Bulk V2 upserts return INSUFFICIENT_ACCESS_OR_READONLY in orgs with Private OWDs or when record ownership has been reassigned away from the integration user. It is the easiest grant to overlook and the most common cause of sync failures on a hand-rolled permset.
Field-level security on the Tightknit custom objects
Grant Read + Edit on every field the sync writes across the three Tightknit objects.
The cleanest approach is to grant Read + Edit on all custom fields on Community__c, Member__c, and Activity__c. That keeps your permset correct across package upgrades without per-version edits.
Troubleshooting
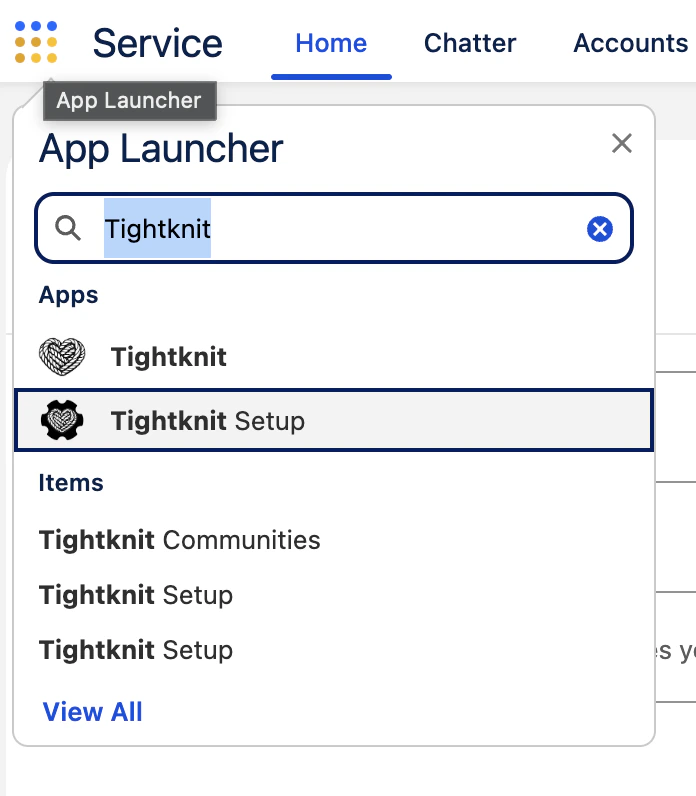
The Tightknit or Tightknit Setup apps don't appear in the App Launcher
The Tightknit or Tightknit Setup apps don't appear in the App Launcher
Member sync fails with 'Field name not found: tightknit__Contact__c'
Member sync fails with 'Field name not found: tightknit__Contact__c'
Member__c.Contact__c lookup is unresolvable. The Tightknit permission set cannot grant access to standard objects (a Salesforce platform limitation), so this must be granted separately. Grant the integration user Read on Contact — see Give the integration user Read access to Contacts. Add Create as well if you enable Create Contacts.The connection test reports missing object or field access
The connection test reports missing object or field access
Member__c.Contact__c.Object describes fail even with the permission set assigned
Object describes fail even with the permission set assigned
A field or object looks accessible in Setup, but the sync still fails on it
A field or object looks accessible in Setup, but the sync still fails on it
Connecting in Studio fails with 'Something went wrong' / 'We couldn't complete the connection'
Connecting in Studio fails with 'Something went wrong' / 'We couldn't complete the connection'
OAUTH_APP_ACCESS_DENIED(“user is not admin approved to access this app”). Your org requires admin approval for the Tightknit Salesforce External Client App, and the user completing the connection isn’t authorized for it. Fix it in Setup → External Client App Manager → Tightknit Salesforce → Policies → OAuth Policies → Permitted Users: either set “All users may self-authorize”, or keep “Admin approved users are pre-authorized” and click Manage Permission Sets to add a permission set the connecting user holds (for example Tightknit Integration User or Tightknit Admin). See Configure the External Client App OAuth Policies, then retry the connection in Studio. The relatedOAUTH_APPROVAL_ERROR_GENERICerror has the same cause and fix.- Connecting a sandbox org. Sandbox orgs aren’t supported and fail the OAuth the same way, so connect a production org instead. See Known Issues.
- The integration user can’t log in (Salesforce Integration / API-Only license). If you connect as a user on the Salesforce Integration license or API Only profile, the interactive OAuth login is blocked and Login History shows a login failure. Connect as a UI-login-capable user instead (see the license note in Run the setup wizard).
The backfill shows 'Failed', or some records didn't sync
The backfill shows 'Failed', or some records didn't sync
Activities fail with 'Foreign key external ID … not found'
Activities fail with 'Foreign key external ID … not found'
Synced records aren't visible to other users in Salesforce
Synced records aren't visible to other users in Salesforce
Known Issues
- Salesforce sandbox orgs are not supported. You can install the managed package in a sandbox and explore the Lightning Web Components (LWCs) by populating Community, Member, and Activity records manually. However, connecting a sandbox org to Tightknit is not supported yet (this is a work-in-progress feature). To run the full integration, connect a production org instead.
- Salesforce configuration is shown per Studio user, not tenant-wide. The Studio currently scopes the Salesforce integration settings to the Studio user who configured them, instead of sharing them across the tenant. Other Studio admins on the same tenant cannot see or collaborate on the same connection. We’re working on making this configuration tenant-wide.
Planned Features
- Pre-built report templates
Create Memberquick action button on Contact detail page- Support for Leads
- Support for Parent Accounts
- More sync interval options
- Custom configuration for linking Tightknit Members to Contacts (beyond email matching)