> ## Documentation Index
> Fetch the complete documentation index at: https://docs.tightknit.ai/llms.txt
> Use this file to discover all available pages before exploring further.
# Event Registration
> Configure and manage event registration settings
When you create or edit an event, you will be able to enable and configure registration settings for the event within Slack.
## Event Settings
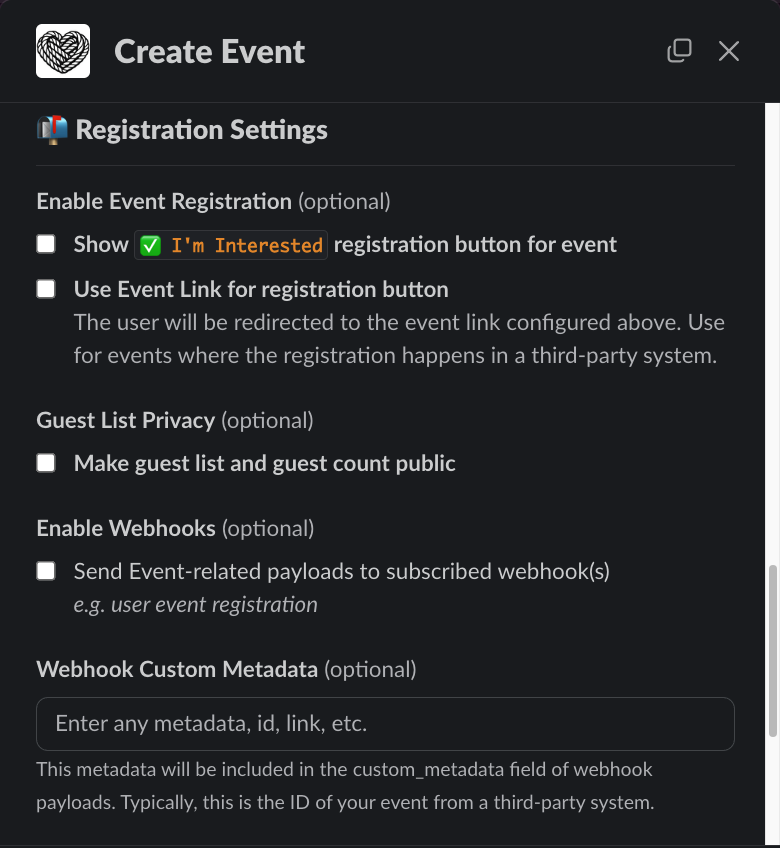
When you create or edit an event, you will be able to configure registration settings for that event under the **Registration Settings** section.
* **Show registration button for event** - enables users to register for the event
* **Use Event Link for registration button** - when enabled, the registration button will redirect users to the URL provided in the *Link* field. The link will no longer be shown in the event body. You must have the registration button enabled and a URL defined in the event *Link* field.
* **Make guest list and guest count public** - when enabled, all users are able to see the number of attendees and the guest list for published events
* **Enable Webhooks** - when enabled, actions related to this Event are emitted to all subscribed [webhooks](/integrations/webhooks)
* **Webhook Custom Metadata** - this value is included as a string in the `custom_metadata` field of the payload sent to the events registration webhook. Can be used to configure [one-click registration](#one-click-registration) by including metadata from a third-party event system.
* **Event Reminders** - select one or more times before the event start to send reminders to attendees. You can set multiple reminders for a single event (e.g. 1 day before and 1 hour before). Note that reminders are only sent if **Event Reminders** are enabled in the [Global Event Settings](/events/global-event-settings). All scheduled reminders are reset when an event is modified. Reminders scheduled in the past are ignored. If you are using [personal join links](#personal-join-links), you *must* configure reminders to ensure attendees can access their link through the notification message.
 **Recommendation**: If your event is hosted entirely through Tightknit in
Slack and you want your companion site to direct users into Slack for
registration, we recommend using the copying the link of the event
announcement message in Slack and using it as the event link in Tightknit. You
can find message links in Slack by hovering over the message, clicking the `⋮`
menu, and selecting `Copy link`.
## Events Webhook
Each time a user registers or unregisters for a Tightknit event in Slack, we send information about the registration action to your subscribed webhooks. [Read More↗](/integrations/webhooks#calendar-events)
## Personal Join Links
Calendar event attendee records can be updated via the [REST API](/api-reference) to include a personal join link to the event, such as a Zoom webinar link that is unique to each user. Join links are included in the private reminder sent to each registrant before the event starts.
**Recommendation**: If your event is hosted entirely through Tightknit in
Slack and you want your companion site to direct users into Slack for
registration, we recommend using the copying the link of the event
announcement message in Slack and using it as the event link in Tightknit. You
can find message links in Slack by hovering over the message, clicking the `⋮`
menu, and selecting `Copy link`.
## Events Webhook
Each time a user registers or unregisters for a Tightknit event in Slack, we send information about the registration action to your subscribed webhooks. [Read More↗](/integrations/webhooks#calendar-events)
## Personal Join Links
Calendar event attendee records can be updated via the [REST API](/api-reference) to include a personal join link to the event, such as a Zoom webinar link that is unique to each user. Join links are included in the private reminder sent to each registrant before the event starts.
 ## Add to Calendar Button
When [event reminders](/events/global-event-settings) are enabled, registrants and participants receive a direct message reminder before the event starts. These reminders include event details and quick action buttons.
An **Add to Calendar** button is automatically displayed on:
* Event announcement messages in channels (*only for events that do not have the registration button enabled*)
* Event reminders sent via direct message
* The Events List panel actions dropdown menu
When users click the **Add to Calendar** button, they can choose to add the event to a supported calendar service.
## One-click Registration
Prevent your users from having to make redundant registrations in multiple places! If your event registration info lives on a third-party platform (e.g., Zoom, Luma, Google Calendar, etc), you can configure one-click registration for your Tightknit events by taking advantage of the webhook feature. In other words, when a user clicks "Register" in Slack, their registration information is forwarded to another system like Zoom.
This is a high-level guide of the steps you might take:
In a webhook application of your choice (e.g., [Zapier](https://zapier.com/features/webhooks), [Make](https://www.make.com/en/integrations/gateway)), create a webhook endpoint that will listen for Tightknit events. Copy the URL of the endpoint. For example, a webhook URL from Zapier might look like this: `https://hooks.zapier.com/hooks/catch/123456/abcd1234`
In the [Tighktnit webhooks admin settings](/integrations/webhooks), register the webhook URL from the previous step as a new webhook.
Determine what information is required to match the event from Tightknit with the event on your third-party platform. Typically, this is a unique identifier (ID) for the event. For example, a Zoom webinar might have an ID like this: `88333096148`.
To edit your event in Tightknit, use the `/events` command, find your event in the list, and select `Edit Event` from the drop-down menu. Under the [**Registration Settings**](#event-settings) section, configure the following:
1. Select the webhook from Step 2 for the **Webhook for Registration Data**
2. Enter the metadata from the Step 3 in the **Webhook Custom Metadata** field
Each time a user clicks the registration button in Slack, Tightknit will send a payload to your webhook URL that contains the custom metadata. You can use this custom metadata to connect the registration information in the third-party platform.
In the webhook application of your choice from Step 1, configure a workflow to take in the [event registration data from Tightknit](#events-webhook). Forward this data to the third-party platform, and connect it to the correct record on that platform by matching on the custom metadata from Step 4.
For more specific examples, explore the following tutorials:
## Add to Calendar Button
When [event reminders](/events/global-event-settings) are enabled, registrants and participants receive a direct message reminder before the event starts. These reminders include event details and quick action buttons.
An **Add to Calendar** button is automatically displayed on:
* Event announcement messages in channels (*only for events that do not have the registration button enabled*)
* Event reminders sent via direct message
* The Events List panel actions dropdown menu
When users click the **Add to Calendar** button, they can choose to add the event to a supported calendar service.
## One-click Registration
Prevent your users from having to make redundant registrations in multiple places! If your event registration info lives on a third-party platform (e.g., Zoom, Luma, Google Calendar, etc), you can configure one-click registration for your Tightknit events by taking advantage of the webhook feature. In other words, when a user clicks "Register" in Slack, their registration information is forwarded to another system like Zoom.
This is a high-level guide of the steps you might take:
In a webhook application of your choice (e.g., [Zapier](https://zapier.com/features/webhooks), [Make](https://www.make.com/en/integrations/gateway)), create a webhook endpoint that will listen for Tightknit events. Copy the URL of the endpoint. For example, a webhook URL from Zapier might look like this: `https://hooks.zapier.com/hooks/catch/123456/abcd1234`
In the [Tighktnit webhooks admin settings](/integrations/webhooks), register the webhook URL from the previous step as a new webhook.
Determine what information is required to match the event from Tightknit with the event on your third-party platform. Typically, this is a unique identifier (ID) for the event. For example, a Zoom webinar might have an ID like this: `88333096148`.
To edit your event in Tightknit, use the `/events` command, find your event in the list, and select `Edit Event` from the drop-down menu. Under the [**Registration Settings**](#event-settings) section, configure the following:
1. Select the webhook from Step 2 for the **Webhook for Registration Data**
2. Enter the metadata from the Step 3 in the **Webhook Custom Metadata** field
Each time a user clicks the registration button in Slack, Tightknit will send a payload to your webhook URL that contains the custom metadata. You can use this custom metadata to connect the registration information in the third-party platform.
In the webhook application of your choice from Step 1, configure a workflow to take in the [event registration data from Tightknit](#events-webhook). Forward this data to the third-party platform, and connect it to the correct record on that platform by matching on the custom metadata from Step 4.
For more specific examples, explore the following tutorials: