> ## Documentation Index
> Fetch the complete documentation index at: https://docs.tightknit.ai/llms.txt
> Use this file to discover all available pages before exploring further.
# Create a New Event
> Learn how to create and publish new events.
Creating an event is a great way to engage your community and share important information.
Events can be published on the community site and in select Slack channels.
By default, only Admins can create events. If you would like to allow
non-Admins to create events, you can do so by adding users to a
[Group](/community/groups) which is assigned a [Permission
Set](/community/permission-sets) with **Manage & Draft Events** (drafts go
through admin approval) or **Manage & Publish Events** (publish directly
without approval) enabled.
You can access events by clicking the `Events` button under the **Events** module in your Tightknit app home.
## Guide
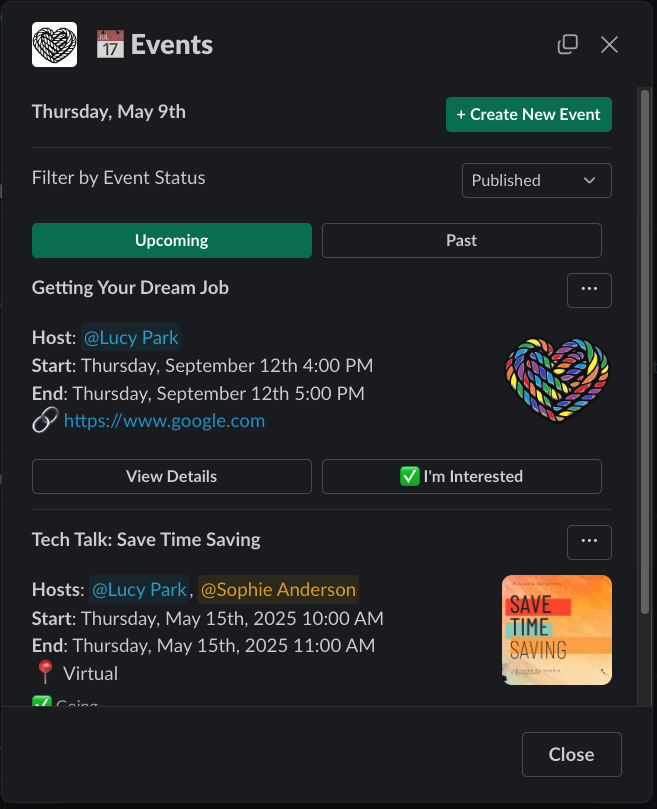 Use the global shortcut `/events` to open to the Events modal. The shortcut option will appear as you type `/events` into any conversation message.
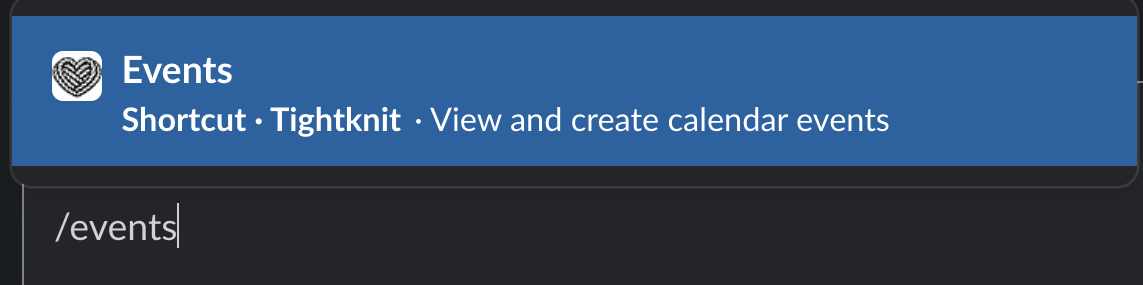 From here, press the `+ Create New Event` button.
If you do not see the `+ Create New Event` button, you may not have the proper
permissions to create events. Please contact your admin for more information.
From here, press the `+ Create New Event` button.
If you do not see the `+ Create New Event` button, you may not have the proper
permissions to create events. Please contact your admin for more information.
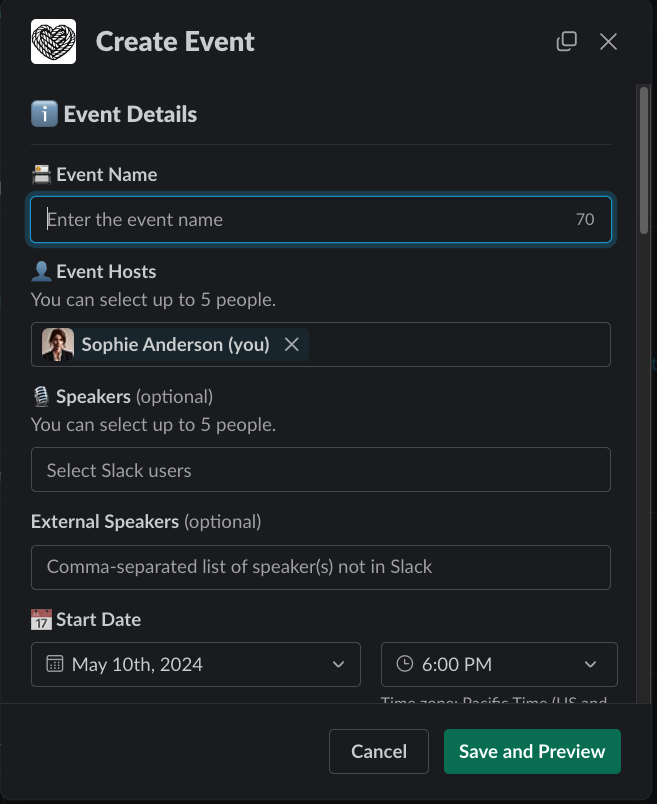 This is where you will add the details of your event.
* **Title**: The title of the event.
* **Hosts**: The host(s) of the event.
* **Speakers**: The speaker(s) of the event (internal Slack users).
* **External Speakers**: The speaker(s) of the event that are external to Slack.
* **Start Date**: The start date and time of the event.
* **End Date**: The end date and time of the event.
* **Link**: A relevant link for the event. Must be a proper `https://` URL. If the Link is not provided, you must provide the Location instead.
* **Location**: The location or address of the event. If the Location is not provided, you must provide the Link instead.
* **Description** (optional): A brief description of the event.
You can upload a cover image for the event that will be displayed in the announcement message and in the event lists. For best results, use an image with 16:9 aspect ratio (recommended dimensions 1280 x 720 px).
If guests are allowed to register for your event, you can configure the settings here. For a more in-depth guide to these settings, see [Event Registration](/events/event-registration).
Within the Publish Settings, you will designate the privacy and audience settings of the event. The *Privacy Level* determines which users in the Slack workspace can discover or access the event:
* **Public**: accessible by all users in the workspace, via the [Events List panel](/events/getting-started#events-list-panel)
* **Unlisted**: accessible only by members of the selected channel(s). Certain users will still see unlisted events in the Events List panel ([read more](/events/getting-started#views)).
You will select the Slack channel(s) that will receive the [event announcement](#published-event-announcement). You may select up to 10 channels.
You may also choose to make the event publicly shared on the community site. The event will appear in the Events list as well as on the Feed page for any Feeds that are connected to your selected Slack channels.
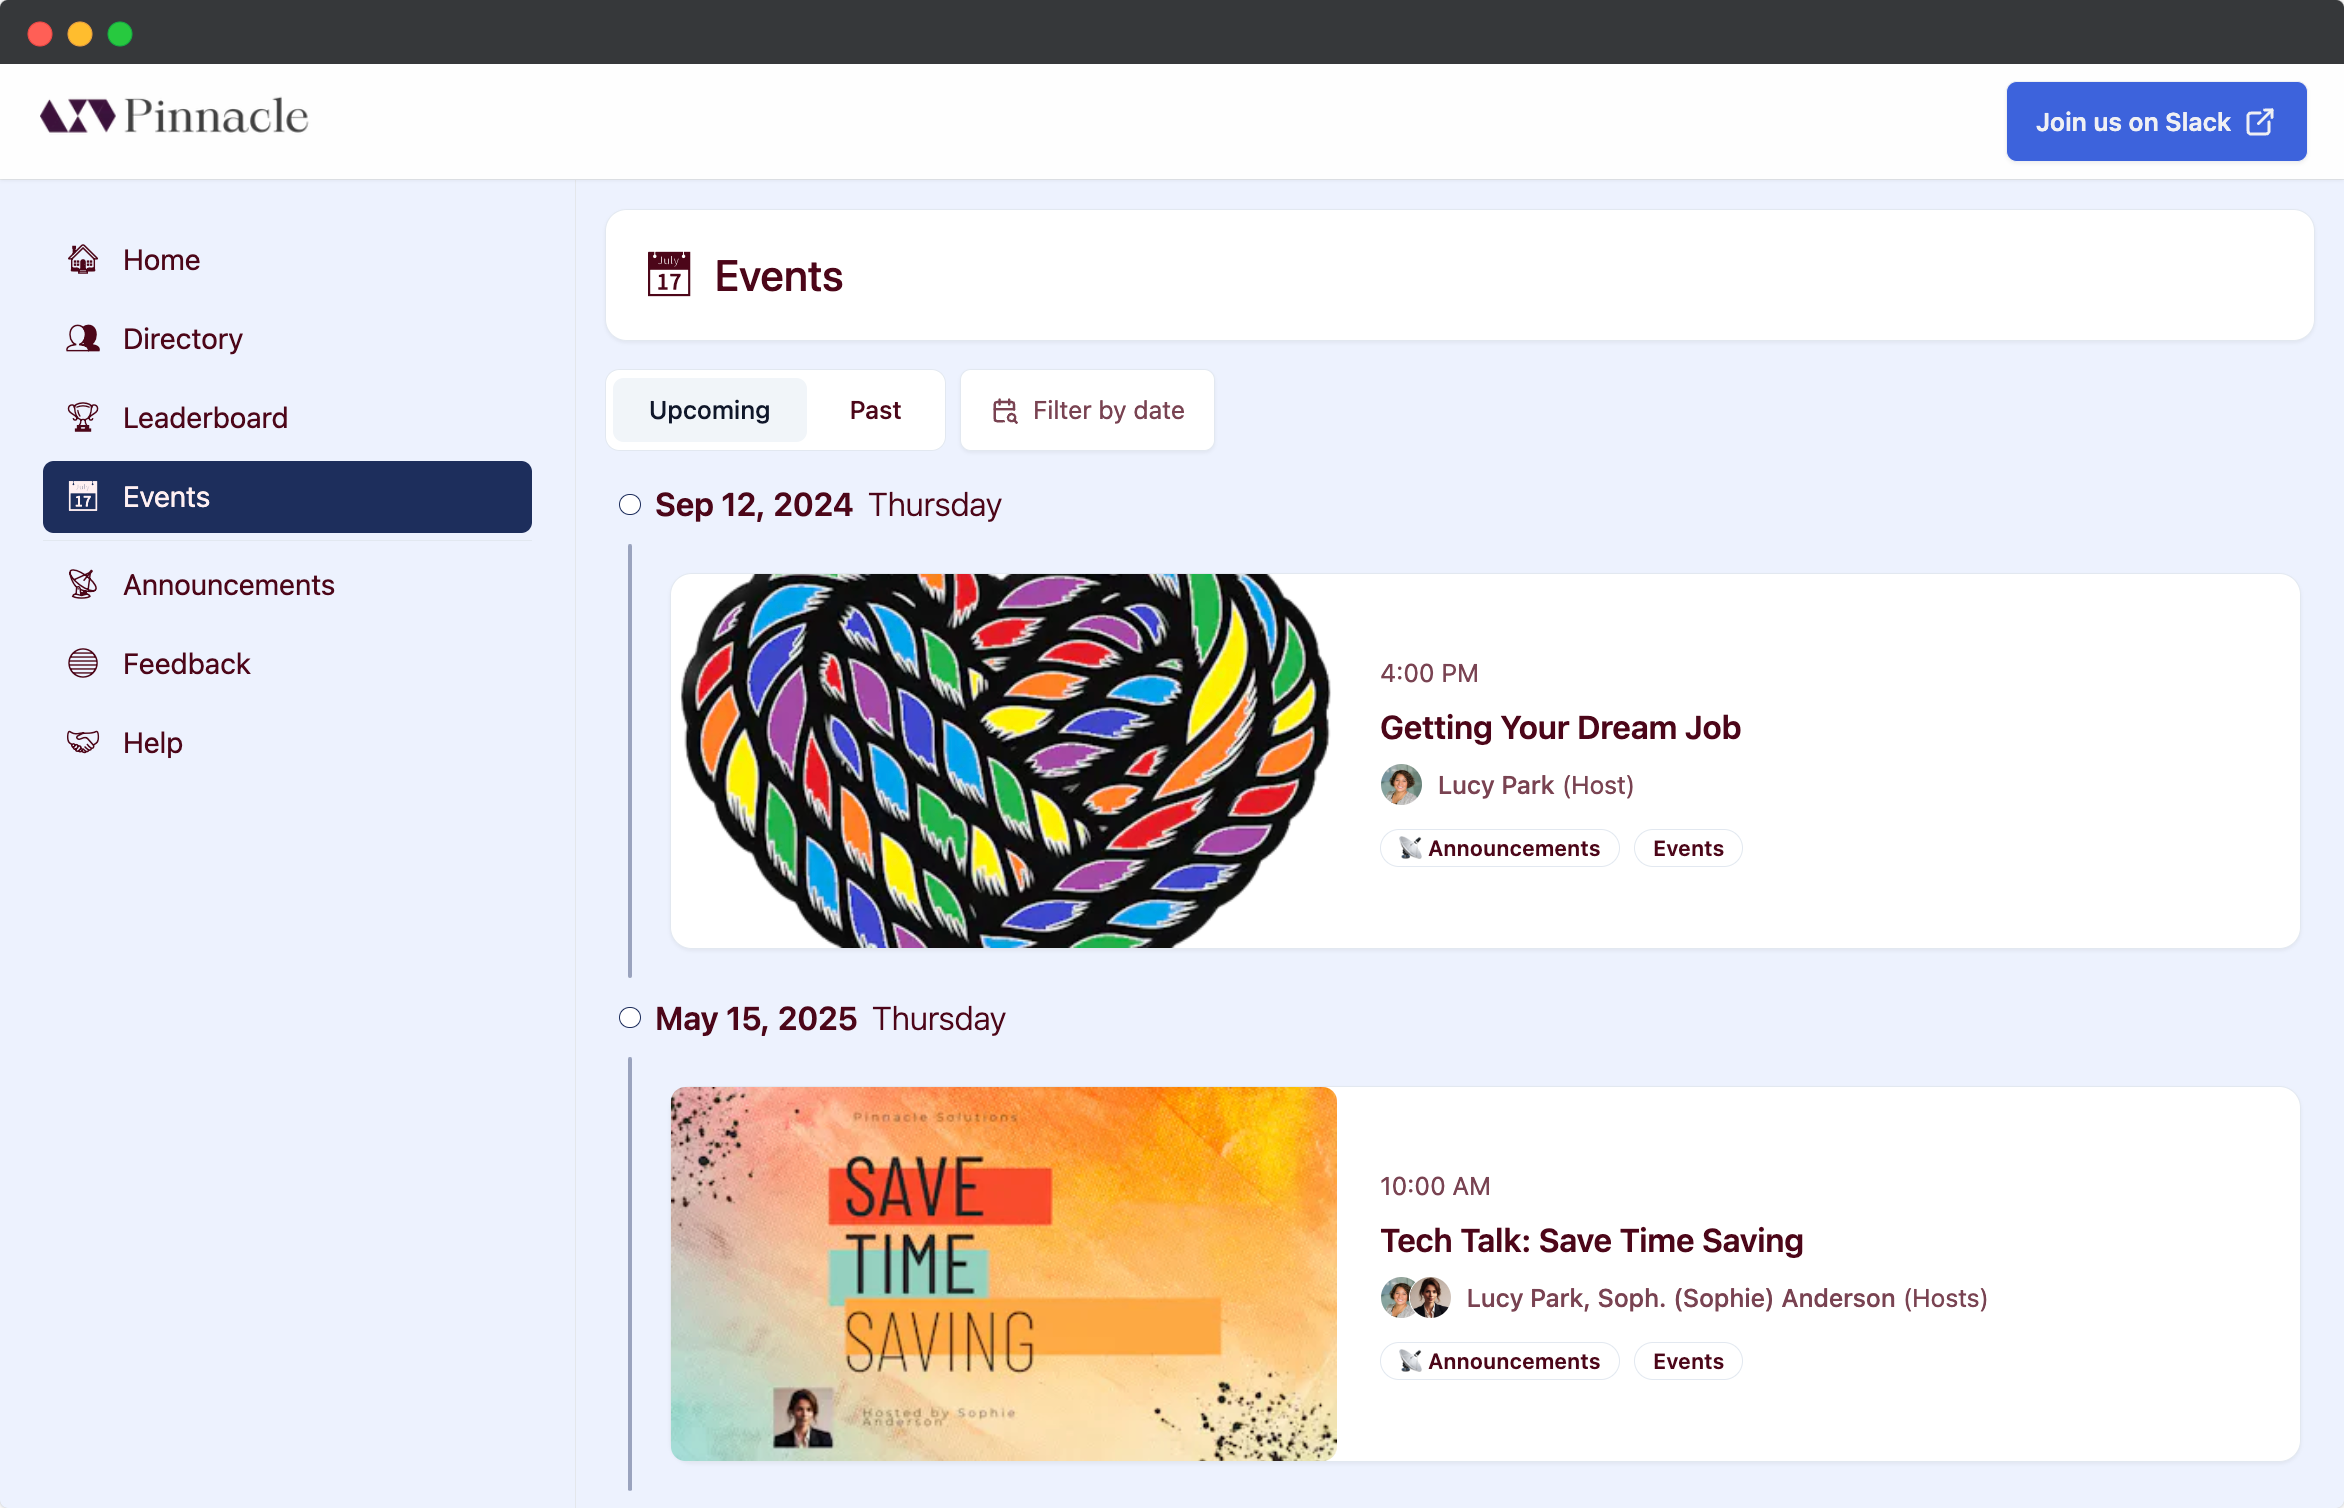
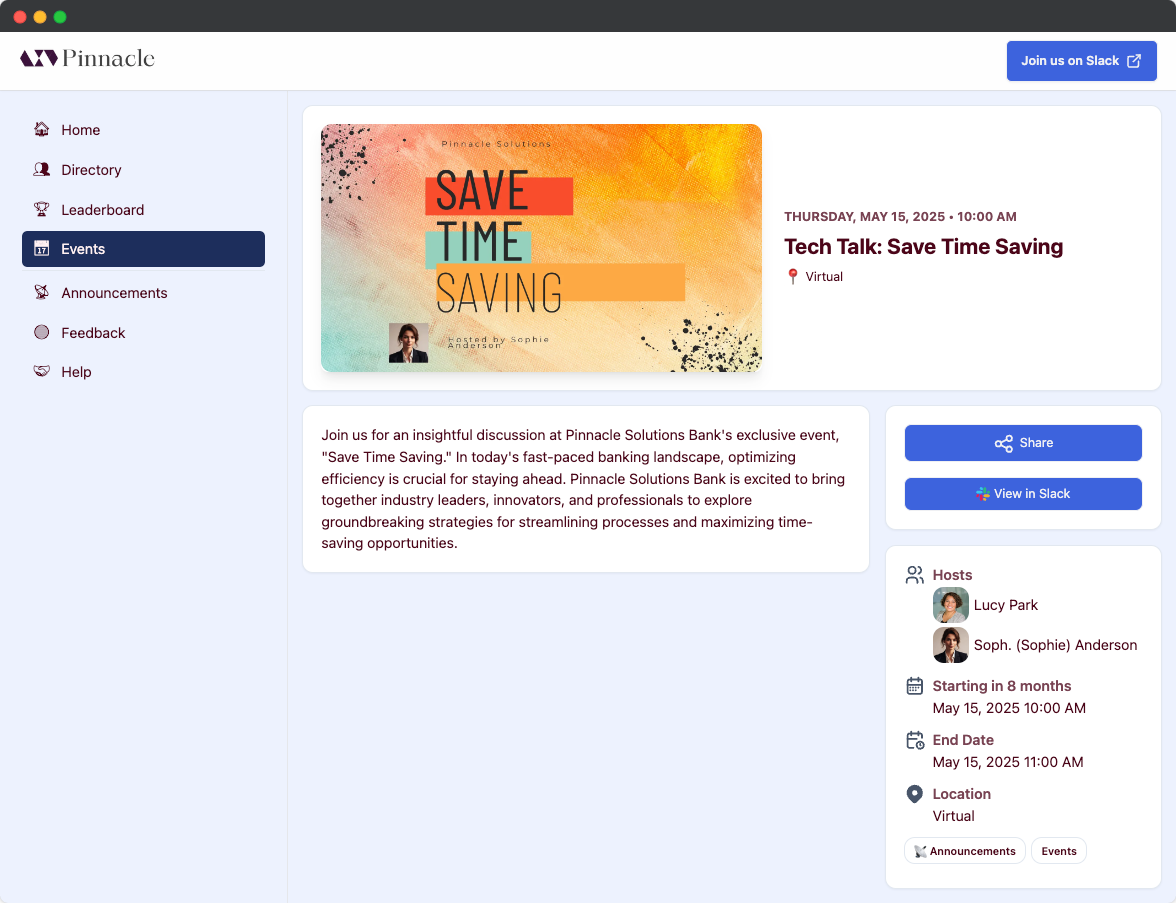
Here is an example event on the community site:
This is where you will add the details of your event.
* **Title**: The title of the event.
* **Hosts**: The host(s) of the event.
* **Speakers**: The speaker(s) of the event (internal Slack users).
* **External Speakers**: The speaker(s) of the event that are external to Slack.
* **Start Date**: The start date and time of the event.
* **End Date**: The end date and time of the event.
* **Link**: A relevant link for the event. Must be a proper `https://` URL. If the Link is not provided, you must provide the Location instead.
* **Location**: The location or address of the event. If the Location is not provided, you must provide the Link instead.
* **Description** (optional): A brief description of the event.
You can upload a cover image for the event that will be displayed in the announcement message and in the event lists. For best results, use an image with 16:9 aspect ratio (recommended dimensions 1280 x 720 px).
If guests are allowed to register for your event, you can configure the settings here. For a more in-depth guide to these settings, see [Event Registration](/events/event-registration).
Within the Publish Settings, you will designate the privacy and audience settings of the event. The *Privacy Level* determines which users in the Slack workspace can discover or access the event:
* **Public**: accessible by all users in the workspace, via the [Events List panel](/events/getting-started#events-list-panel)
* **Unlisted**: accessible only by members of the selected channel(s). Certain users will still see unlisted events in the Events List panel ([read more](/events/getting-started#views)).
You will select the Slack channel(s) that will receive the [event announcement](#published-event-announcement). You may select up to 10 channels.
You may also choose to make the event publicly shared on the community site. The event will appear in the Events list as well as on the Feed page for any Feeds that are connected to your selected Slack channels.
Here is an example event on the community site:
 When you have completed the event information, press the "Save and Preview". A draft of your event will automatically be saved, and it is safe to close the modal.
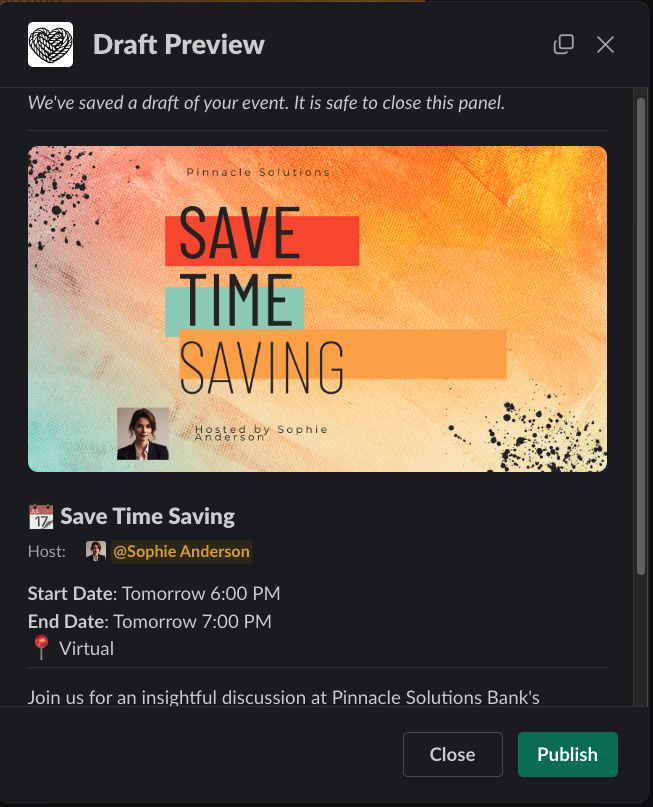 #### Submitting from Draft Preview
You'll also have the option to submit your event at this time, if you choose. The submit button you see depends on your permissions:
* Admins and users with **Manage & Publish Events** see "Publish Event", which immediately publishes the event.
* Users with **Manage & Draft Events** see "Submit for Approval", which sends the event to admins for review.
#### Save For Later
You can always come back to work on this event later if you exit the modal. Once you are ready to publish your event, open the Events panel and navigate to `My Drafts`.
On the overflow menu, you'll see the option to submit your event.
* If you are an admin or have the **Manage & Publish Events** permission, you'll see the option to "Publish Event".
* If you have the **Manage & Draft Events** permission (without publish), you will see a "Submit for Approval" option.
If you only have the **Manage & Draft Events** permission, you will first need an admin to approve your event before it is published. Once approved, the event will be published to the channels you selected.
If you are an admin, you will see the events awaiting approval under the "Needs Approval" dropdown selection. If you go to the overflow menu, you can approve the event which will publish it immediately.
You will also receive notifications for the approval requests in your [Tightknit Hub channel](/slack/community-settings#tightknit-hub-channel), from which you can directly approve and publish the event, edit the event, or DM the event creator for clarifications.
## Published Event Announcement
Your event will be announced on the channel(s) you selected. Congrats! 🎉
#### Submitting from Draft Preview
You'll also have the option to submit your event at this time, if you choose. The submit button you see depends on your permissions:
* Admins and users with **Manage & Publish Events** see "Publish Event", which immediately publishes the event.
* Users with **Manage & Draft Events** see "Submit for Approval", which sends the event to admins for review.
#### Save For Later
You can always come back to work on this event later if you exit the modal. Once you are ready to publish your event, open the Events panel and navigate to `My Drafts`.
On the overflow menu, you'll see the option to submit your event.
* If you are an admin or have the **Manage & Publish Events** permission, you'll see the option to "Publish Event".
* If you have the **Manage & Draft Events** permission (without publish), you will see a "Submit for Approval" option.
If you only have the **Manage & Draft Events** permission, you will first need an admin to approve your event before it is published. Once approved, the event will be published to the channels you selected.
If you are an admin, you will see the events awaiting approval under the "Needs Approval" dropdown selection. If you go to the overflow menu, you can approve the event which will publish it immediately.
You will also receive notifications for the approval requests in your [Tightknit Hub channel](/slack/community-settings#tightknit-hub-channel), from which you can directly approve and publish the event, edit the event, or DM the event creator for clarifications.
## Published Event Announcement
Your event will be announced on the channel(s) you selected. Congrats! 🎉
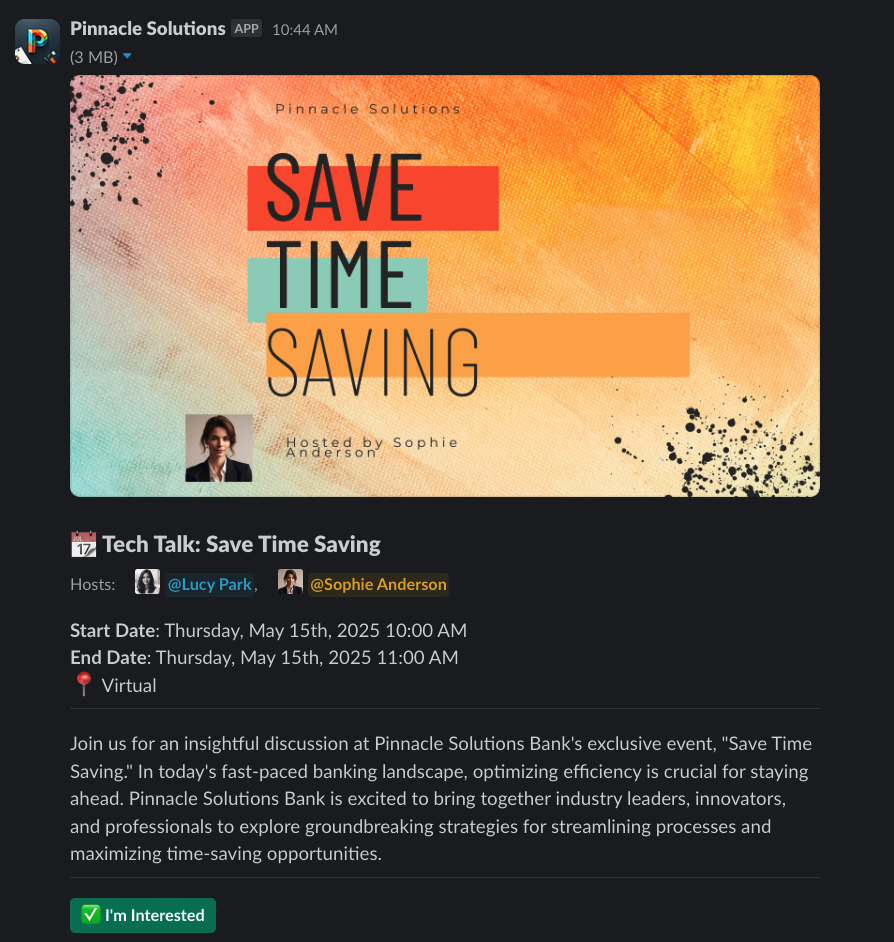 Need to make updates? No worries! Any further edits you make to the event details will be automatically reflected on *all* of the announcement messages.
## Integrations
### Luma
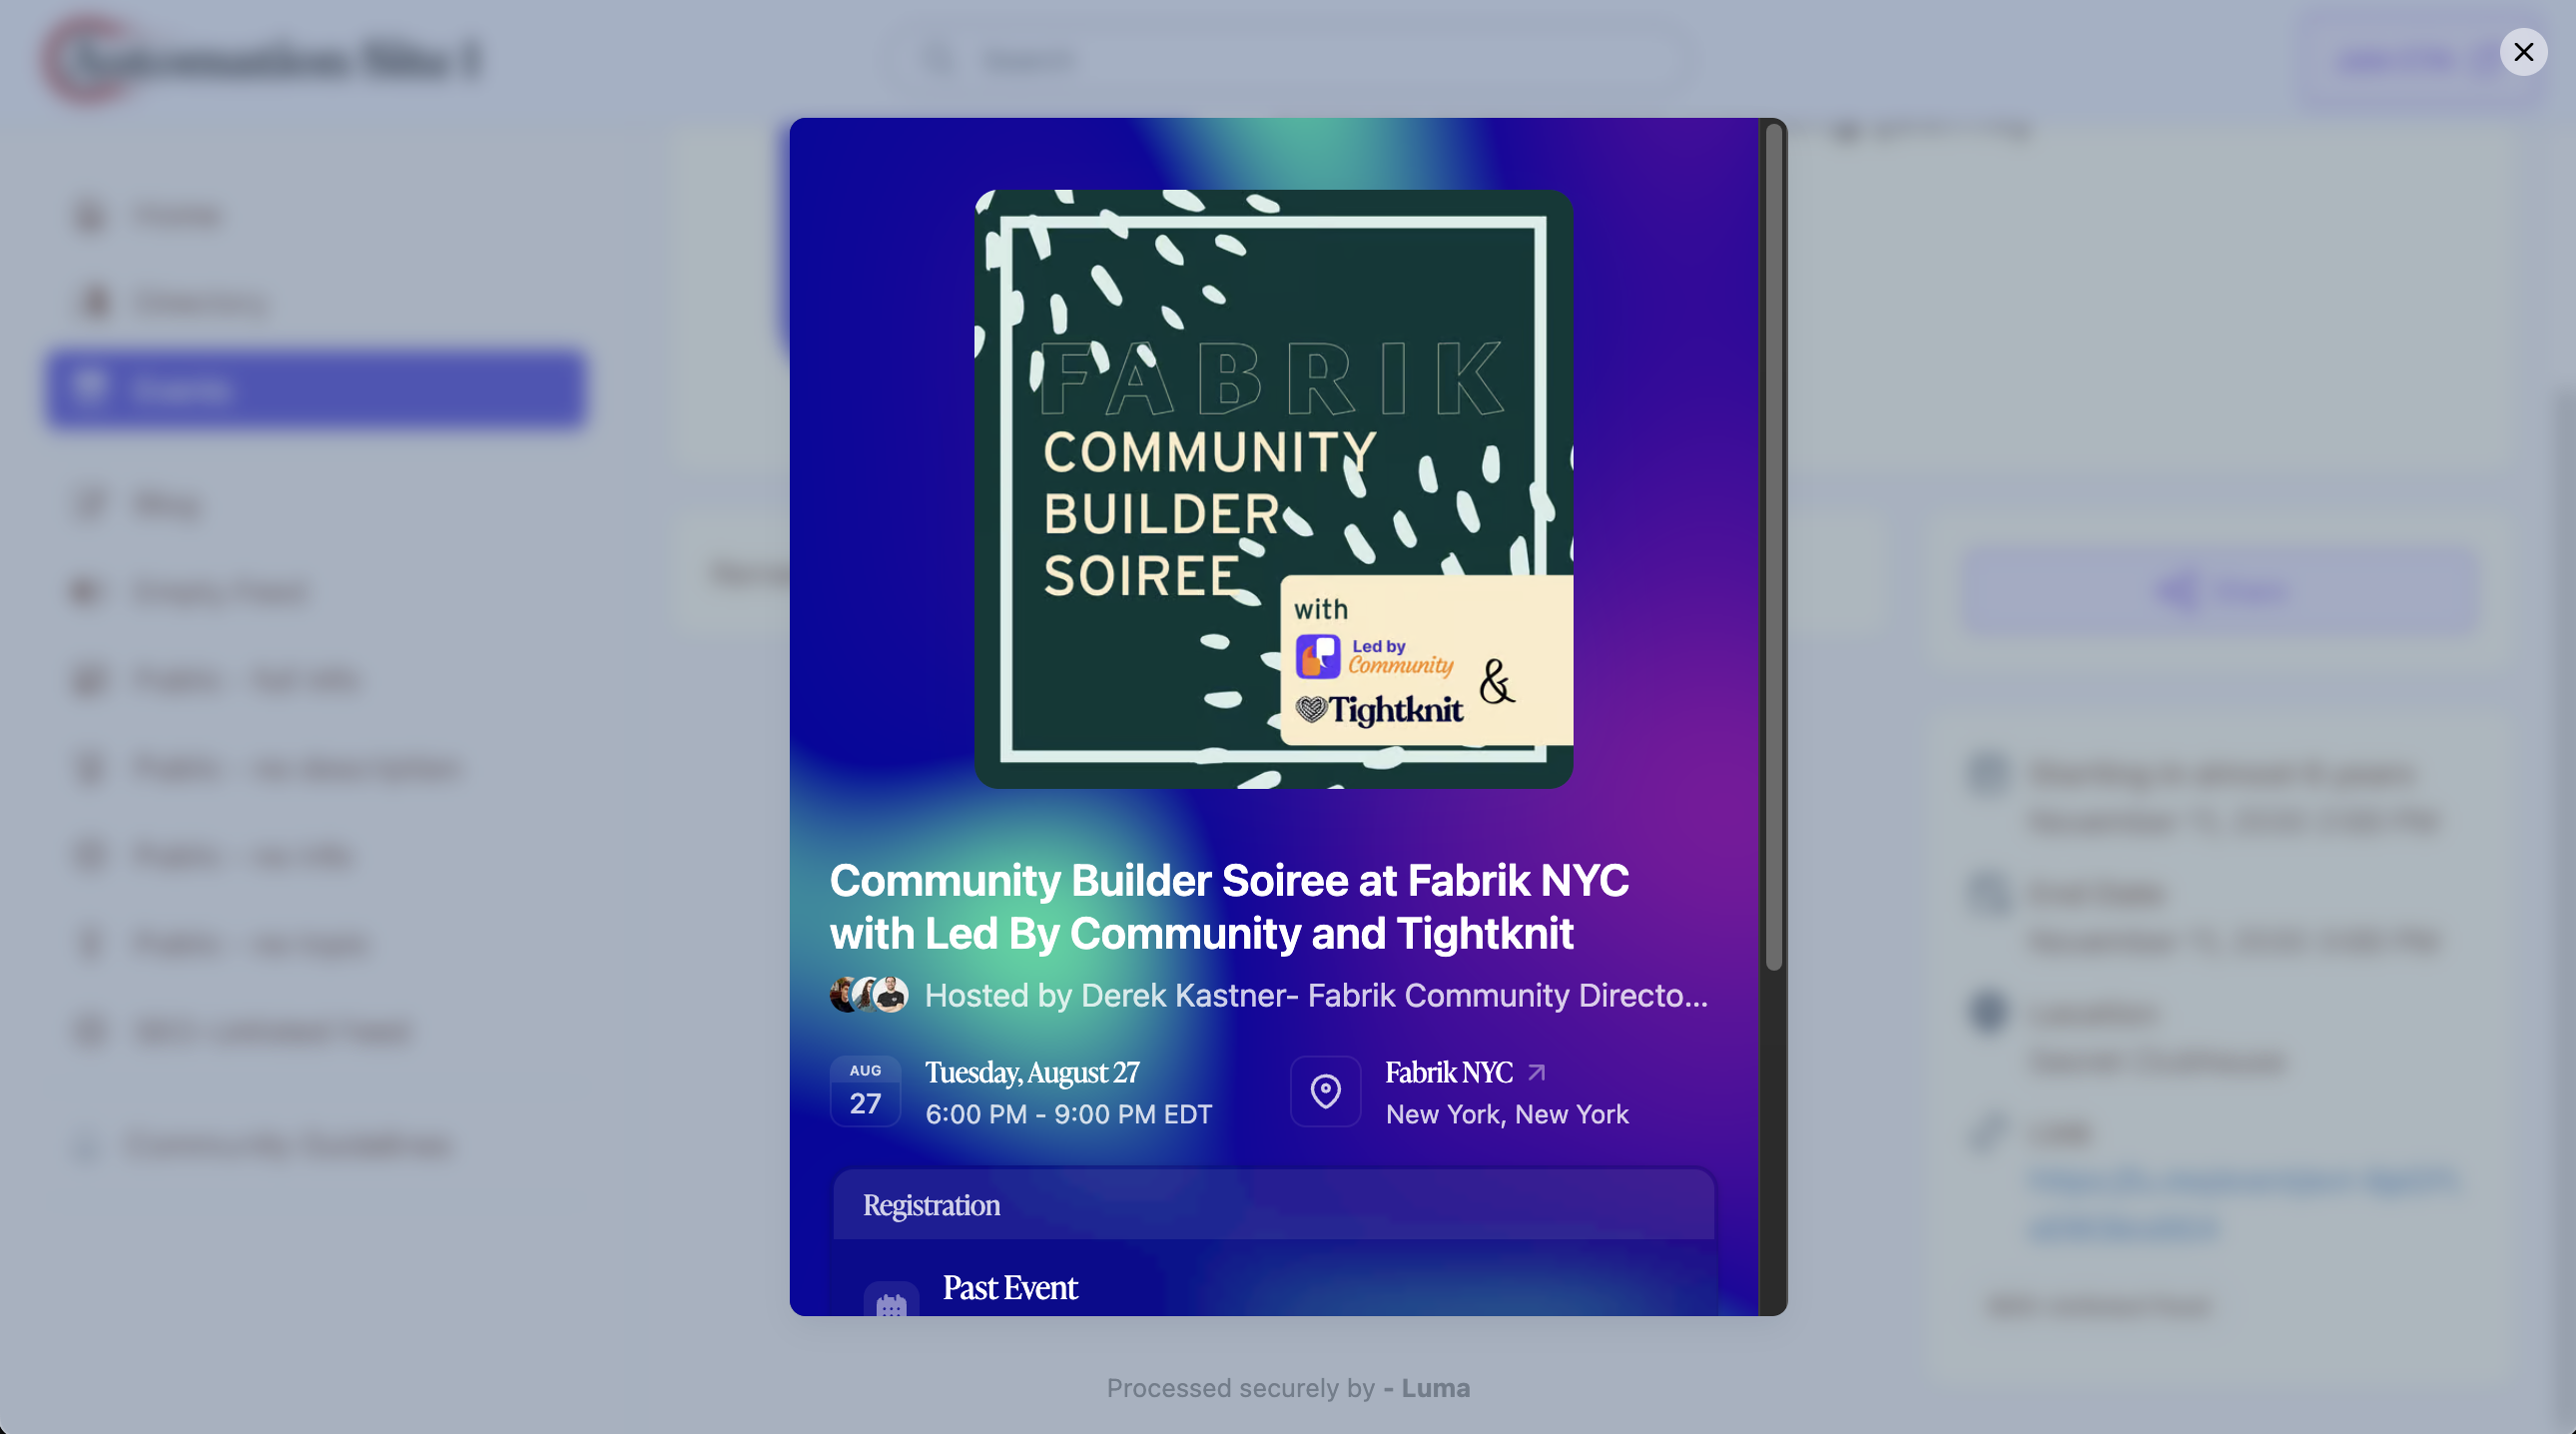
When you provide a [Luma](https://lu.ma/) URL, like `https://lu.ma/event/evt-XYZ123`, for the **Event Link** of a Tightknit event, we provide an integrated 1-click registration experience within the Event Page on the community site.
Need to make updates? No worries! Any further edits you make to the event details will be automatically reflected on *all* of the announcement messages.
## Integrations
### Luma
When you provide a [Luma](https://lu.ma/) URL, like `https://lu.ma/event/evt-XYZ123`, for the **Event Link** of a Tightknit event, we provide an integrated 1-click registration experience within the Event Page on the community site.
 ## Related topics
- [Getting Started](/events/getting-started.md)
- [Create calendar event](/api-reference/calendar-events/create-calendar-event.md)
- [Automated Onboarding Journeys](/guides/set-up-automated-onboarding-journeys.md)
- [Journeys](/gamification/journeys.md)
- [Awards](/gamification/awards.md)
## Related topics
- [Getting Started](/events/getting-started.md)
- [Create calendar event](/api-reference/calendar-events/create-calendar-event.md)
- [Automated Onboarding Journeys](/guides/set-up-automated-onboarding-journeys.md)
- [Journeys](/gamification/journeys.md)
- [Awards](/gamification/awards.md)